Difference between revisions of "Schedule"
| (11 intermediate revisions by the same user not shown) | |||
| Line 1: | Line 1: | ||
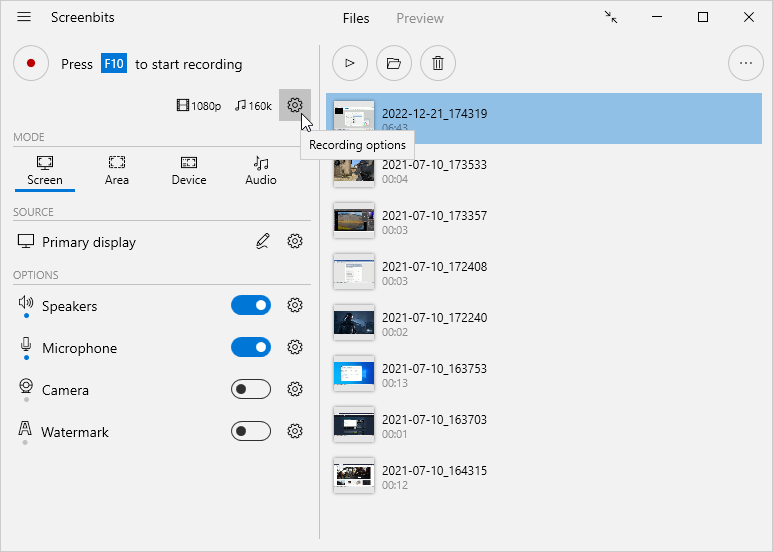
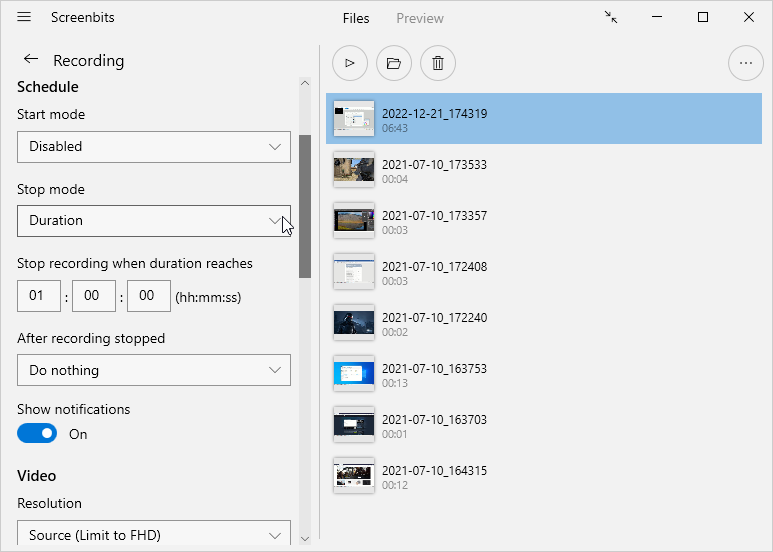
| − | You can use | + | You can use schedule options to start and/or stop recording automatically at a certain time or when duration or size of the output file reaches a limit. To view schedule options, click '''Recording options''' button from [[Getting_started#Application_window|application window]] then navigate to ''Schedule'' section. |
[[File:recording-options.png|frame|left|Figure 1: Recording options]] | [[File:recording-options.png|frame|left|Figure 1: Recording options]] | ||
| Line 7: | Line 7: | ||
<br clear=all> | <br clear=all> | ||
| + | == Start at a certain time == | ||
| + | To start recording a certain time: | ||
| + | #Click '''Recording options''' button from [[Getting_started#Application_window|application window]] to view ''Recording options''. | ||
| + | #Choose '''Time''' for ''Start mode'' under ''Schedule'' section. | ||
| + | #Enter the time which you want to start recording. | ||
| + | |||
| + | == Pause at a certain time == | ||
| + | To pause recording a certain time: | ||
| + | #Click '''Recording options''' button from [[Getting_started#Application_window|application window]] to view ''Recording options''. | ||
| + | #Choose '''Time''' for ''Pause mode'' under ''Schedule'' section. | ||
| + | #Enter the time which you want recording pause at. | ||
| + | |||
| + | == Pause by duration == | ||
| + | To pause recording by duration: | ||
| + | #Click '''Recording options''' button from [[Getting_started#Application_window|application window]] to view ''Recording options''. | ||
| + | #Choose '''Duration''' for ''Pause mode'' under ''Schedule'' section. | ||
| + | #Enter the duration which you want recording pause at. The default is 1 hour (1:00:00). | ||
| + | |||
| + | == Pause by size == | ||
| + | To pause recording by size of the output file: | ||
| + | #Click '''Recording options''' button from [[Getting_started#Application_window|application window]] to view ''Recording options''. | ||
| + | #Choose '''Size''' for ''Pause mode'' under ''Schedule'' section. | ||
| + | #Enter the file size which you want recording pause at. The default is 1 gigabytes (1GB). | ||
| + | |||
| + | == Pause at a certain time == | ||
| + | To pause recording a certain time: | ||
| + | #Click '''Recording options''' button from [[Getting_started#Application_window|application window]] to view ''Recording options''. | ||
| + | #Choose '''Time''' for ''Pause mode'' under ''Schedule'' section. | ||
| + | #Enter the time which you want recording pause at. | ||
== Stop by duration == | == Stop by duration == | ||
| Line 33: | Line 62: | ||
#Choose a mode for ''Stop mode'' under ''Schedule'' section then enter the desired size, duration or time to stop. | #Choose a mode for ''Stop mode'' under ''Schedule'' section then enter the desired size, duration or time to stop. | ||
#Click the selector under ''After recording stopped'' then choose '''Start new recording''' | #Click the selector under ''After recording stopped'' then choose '''Start new recording''' | ||
| + | |||
| + | == Use other apps == | ||
| + | You can control recording through [[CLI|command line interface]] which makes it possible to use other apps such as [https://en.wikipedia.org/wiki/Windows_Task_Scheduler Windows Task Scheduler] to control recording. | ||
| + | |||
| + | For example, you can use [[CLI#Commands|start]] command and ''Windows Task Scheduler'' to automatically start recording at a specific time or day of the week. This is useful for complex scheduling scenarios which is not covered by the scheduling options provided by Screenbits. | ||
<!-- | <!-- | ||
Latest revision as of 09:24, 17 February 2025
You can use schedule options to start and/or stop recording automatically at a certain time or when duration or size of the output file reaches a limit. To view schedule options, click Recording options button from application window then navigate to Schedule section.
Contents
Start at a certain time
To start recording a certain time:
- Click Recording options button from application window to view Recording options.
- Choose Time for Start mode under Schedule section.
- Enter the time which you want to start recording.
Pause at a certain time
To pause recording a certain time:
- Click Recording options button from application window to view Recording options.
- Choose Time for Pause mode under Schedule section.
- Enter the time which you want recording pause at.
Pause by duration
To pause recording by duration:
- Click Recording options button from application window to view Recording options.
- Choose Duration for Pause mode under Schedule section.
- Enter the duration which you want recording pause at. The default is 1 hour (1:00:00).
Pause by size
To pause recording by size of the output file:
- Click Recording options button from application window to view Recording options.
- Choose Size for Pause mode under Schedule section.
- Enter the file size which you want recording pause at. The default is 1 gigabytes (1GB).
Pause at a certain time
To pause recording a certain time:
- Click Recording options button from application window to view Recording options.
- Choose Time for Pause mode under Schedule section.
- Enter the time which you want recording pause at.
Stop by duration
To stop recording by duration:
- Click Recording options button from application window to view Recording options.
- Choose Duration for Stop mode under Schedule section.
- Enter the duration which you want recording stop at. The default is 1 hour (1:00:00).
Stop by size
To stop recording by size of the output file:
- Click Recording options button from application window to view Recording options.
- Choose Size for Stop mode under Schedule section.
- Enter the file size which you want recording stop at. The default is 1 gigabytes (1GB).
Stop at a certain time
To stop recording a certain time:
- Click Recording options button from application window to view Recording options.
- Choose Time for Stop mode under Schedule section.
- Enter the time which you want recording stop at.
Restart recording
You can choose to start recording immediately right after previous session stops automatically. This feature is useful when you want to automatically split the output into multiple files with specific duration or size.
To enable restarting recording:
- Click Recording options button from application window to view Recording options.
- Choose a mode for Stop mode under Schedule section then enter the desired size, duration or time to stop.
- Click the selector under After recording stopped then choose Start new recording
Use other apps
You can control recording through command line interface which makes it possible to use other apps such as Windows Task Scheduler to control recording.
For example, you can use start command and Windows Task Scheduler to automatically start recording at a specific time or day of the week. This is useful for complex scheduling scenarios which is not covered by the scheduling options provided by Screenbits.

