Difference between revisions of "Capture mode"
From User Manual :: Screenbits
(→Screen) |
|||
| Line 5: | Line 5: | ||
== Screen == | == Screen == | ||
This mode allows you to record full screen. | This mode allows you to record full screen. | ||
| − | #From the application window, click '''Screen''' button under''Mode'' section. | + | #From the application window, click '''Screen''' button under ''Mode'' section. |
#If you have multiple Screens choose which screen you want to record or choose '''All Screens''' to record all of them. | #If you have multiple Screens choose which screen you want to record or choose '''All Screens''' to record all of them. | ||
#Click '''Record''' button to start recording. | #Click '''Record''' button to start recording. | ||
| Line 11: | Line 11: | ||
== Window == | == Window == | ||
Use this mode to record a window area. | Use this mode to record a window area. | ||
| − | #From the application window, click '''Area''' button | + | #From the application window, click '''Area''' button under ''Mode'' section. |
#From the menu, click '''Window''' to open area selector. | #From the menu, click '''Window''' to open area selector. | ||
#Click on a window to record. | #Click on a window to record. | ||
| Line 19: | Line 19: | ||
== Rectangle == | == Rectangle == | ||
Use this mode to record a rectangular area of desktop. | Use this mode to record a rectangular area of desktop. | ||
| − | #From the application window, click '''Area''' button to open area menu. | + | #From the application window, click '''Area''' button under ''Mode'' section to open area menu. |
#From the menu, click '''Rectangle''' to open area selector. | #From the menu, click '''Rectangle''' to open area selector. | ||
#Select an area on the desktop. | #Select an area on the desktop. | ||
| Line 27: | Line 27: | ||
== Pointer == | == Pointer == | ||
Use this option to record the area around the mouse pointer. | Use this option to record the area around the mouse pointer. | ||
| − | #From the application window, click '''Area''' button to open area menu. | + | #From the application window, click '''Area''' button under ''Mode'' section to open area menu. |
#From the menu, click '''Pointer''' to open area selector. | #From the menu, click '''Pointer''' to open area selector. | ||
#Change size of the of area around the pointer if needed. | #Change size of the of area around the pointer if needed. | ||
#Click '''OK''' to close the selector. | #Click '''OK''' to close the selector. | ||
#Click '''Record''' button to start recording. | #Click '''Record''' button to start recording. | ||
Revision as of 13:55, 19 January 2021
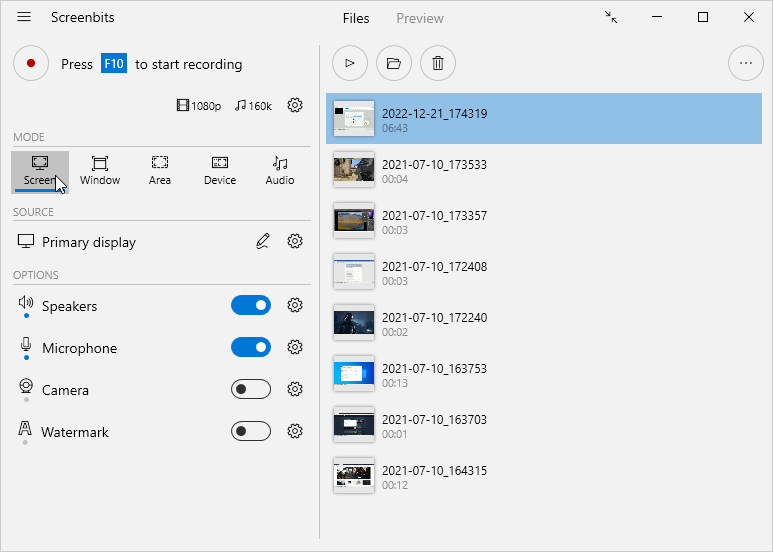
Screenbits can record in different modes. You can change the mode under Mode section from the App Window.
Contents
Screen
This mode allows you to record full screen.
- From the application window, click Screen button under Mode section.
- If you have multiple Screens choose which screen you want to record or choose All Screens to record all of them.
- Click Record button to start recording.
Window
Use this mode to record a window area.
- From the application window, click Area button under Mode section.
- From the menu, click Window to open area selector.
- Click on a window to record.
- Click OK to close the selector.
- Click Record button to start recording.
Rectangle
Use this mode to record a rectangular area of desktop.
- From the application window, click Area button under Mode section to open area menu.
- From the menu, click Rectangle to open area selector.
- Select an area on the desktop.
- Click OK to close the selector.
- Click Record button to start recording.
Pointer
Use this option to record the area around the mouse pointer.
- From the application window, click Area button under Mode section to open area menu.
- From the menu, click Pointer to open area selector.
- Change size of the of area around the pointer if needed.
- Click OK to close the selector.
- Click Record button to start recording.
